HIGHLIGHT AND CONTOURING TECHNIQUES

Whether you’re going for a subtle glow or a full glam sculpted look, highlighting and contouring can transform your makeup routine. These techniques bring dimension to your face, enhance your natural features, and add a touch of radiance, making them essential tools in any beauty arsenal. But getting the perfect balance of highlight and contour can feel tricky for beginners and experienced makeup enthusiasts alike. In this blog, we’ll break down the essentials of highlighting and contouring and share pro tips on application. Get ready to illuminate your beauty routine and sculpt your way to a flawless look!
Contouring with powder is a great option if you want a soft, natural look that’s easy to blend. Here’s a step-by-step guide to achieving a perfectly sculpted look with powder contour:
1. Prep Your Skin
Start with a clean, moisturized face. Follow up with your foundation and concealer to create an even base. Since you’ll be applying powder contour, it’s best to use a setting powder over any liquid or cream products to ensure smooth application and prevent the powder from clinging or patching.
2. Choose the Right Powder Contour Shade
Select a contour powder that’s about 1-2 shades darker than your natural skin tone. Look for a matte finish, as this will create natural shadows without any shine.
We Love: Kryolan Dual Finish
A creamy, high pigment powder that blends seamlessly to avoid harsh lines and its matte finish makes it the perfect shader.
3. Use the Right Tools
Use an angled contour brush or a fluffy brush with a slightly tapered end for more control. Brushes with natural bristles work best, as they pick up just the right amount of product and blend seamlessly.
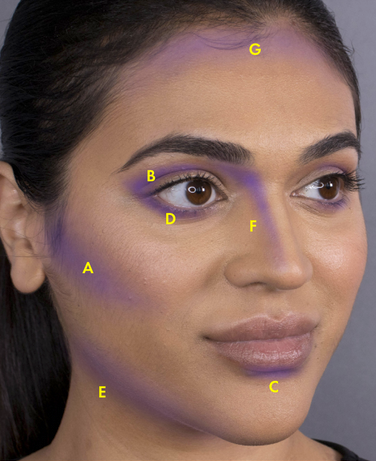
4. Apply Contour to Key Areas
-
Cheekbones: Lightly sweep the powder under your cheekbones, starting near your ear and blending towards the middle of your cheek.
-
Jawline: To define your jawline, apply contour along the jaw and blend downwards to avoid any harsh lines.
-
Forehead: Dust contour powder along your hairline to minimize the forehead area and add warmth.
-
Nose (optional): For a more defined nose, apply a small amount of contour powder along the sides of your nose with a smaller brush.
5. Blend Thoroughly
Blending is key! Use a clean fluffy brush or a beauty sponge to blend the contour powder, ensuring there are no harsh lines. You should see soft, natural shadows that enhance your features.
Highlighting with powder is a fantastic way to add a natural glow and enhance your features without overpowering the look. Here’s a simple guide to applying powder highlighter for a luminous finish:
1. Prep and Base
Start with a well-moisturized and even base—foundation, concealer, and a setting powder if needed. Powder highlighter works best on dry or powdered surfaces, as it adheres smoothly and blends beautifully.
2. Choose the Right Highlighter Shade
We Love: Kryolan Glamour Glow
With dazzling light reflective particles the Glamour Glows can be worn sheerly for a soft glow or layered for next-level radiance. This finely milled powder gives you the glow without caking or visible glitter particles.
Pick a shade that complements your skin tone. Here’s a quick guide:
-
Fair to Light Skin Tones: Champagne or pearl shades work well.
-
Medium to Olive Skin Tones: Golden or peachy highlighters add warmth.
-
Deep Skin Tones: Rich golds and bronzes look stunning on deeper complexions.
3. Use the Right Brush
For powder highlighter, use a fan brush or a small, tapered highlighting brush. A fan brush provides a softer, more diffused glow, while a tapered brush allows for more precise application and intensity.
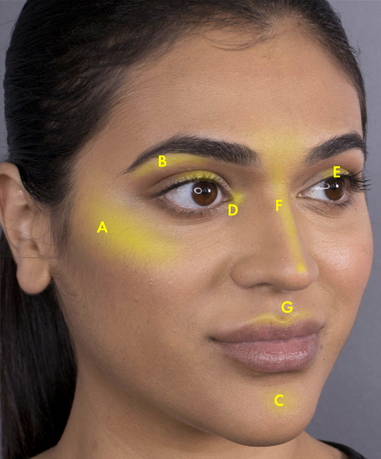
4. Apply to the High Points of the Face
Focus on areas that naturally catch the light:
-
Cheekbones: Sweep the highlighter along the tops of your cheekbones, moving up towards the temple.
-
Bridge of the Nose: Apply a small amount down the bridge for a subtle lift, avoiding the tip if you prefer a more natural look.
-
Brow Bone: Lightly dust the area just below your eyebrow to accentuate the eyes.
-
Cupid’s Bow: Apply a bit above the centre of your upper lip to create a fuller lip appearance.
-
Inner Corners of the Eyes (optional): A touch of highlighter here brightens the eyes and makes them look more awake.
5. Blend for a Natural Glow
After applying, blend out any harsh edges with a clean brush to ensure a seamless transition between the highlight and your skin.
After Highlighting and Contouring, ensure you lock in your look with a quick spritz of Setting Spray.
Creams and Underpainting
Contouring and highlighting with creams can be a great technique if you prefer a really dewy, glowy finish and want to avoid powdering.
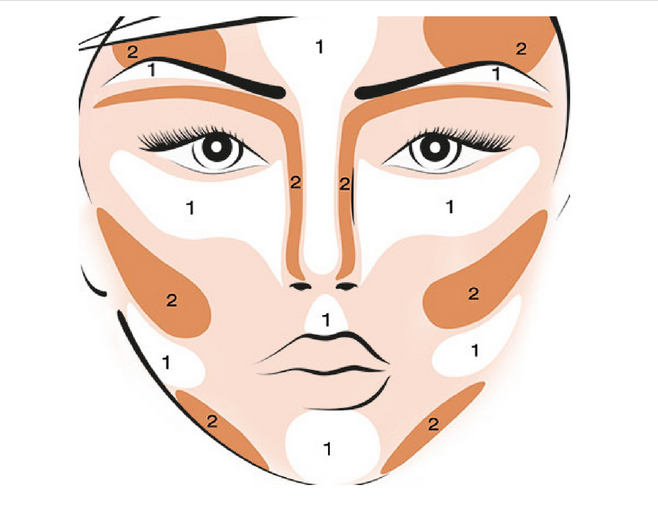
The application is exactly the same in terms of placement, just remember a little goes a long way as you blend it out!
This can be a really soft, natural technique if you use minimal product. Or blend minimally for an extremely sculpted look.
Underpainting:
Underpainting with cream makeup is a makeup technique that involves applying contour, highlight, and blush beneath your foundation to create a natural, blended look. This method can help create a soft, dimensional base without using too many layers. Here’s a step-by-step guide on how to underpaint with cream products:
We Love: TV Paintstick in shades D33.1 (contour) and 406 (highlight)
1. Start with a Clean, Prepped Face
Make sure your skin is clean, moisturized, and primed. Underpainting works best when the skin is well-hydrated, as it allows the cream products to blend smoothly.
2. Apply Cream Contour
Using a cream contour product that’s 1-2 shades darker than your natural skin tone:
-
Cheekbones: Apply contour under your cheekbones, blending upwards toward your hairline.
-
Forehead: Place contour along the hairline, especially if you want to minimize the appearance of a larger forehead.
-
Jawline: Apply contour along the jawline and blend downwards for definition.
-
Nose (optional): Add contour along the sides of your nose for a subtle contour effect.

Tip: Use a small, dense brush or a makeup sponge to blend each area. Don’t worry if the contour seems strong—you’ll be blending foundation over it in later steps.
3. Add Cream Highlight
Choose a cream highlighter or concealer 1-2 shades lighter than your skin tone:
-
Under the Eyes: Apply in a triangular shape under the eyes to brighten the area.
-
Centre of the Forehead: Dab a small amount in the centre to create balance.
-
Bridge of the Nose: A little on the bridge (and tip, if desired) can enhance nose shape.
-
Chin: Apply a touch to the centre of the chin to highlight it.
-
Under the Contour Line on Cheeks (optional): This can give your cheek contour a lifted look.
Blend the highlight into the contour areas gently to avoid harsh lines.
4. Apply Cream Blush (Optional)
Place cream blush on the apples of your cheeks and blend upwards towards the temples. This adds a natural flush of colour that will shine through once you apply foundation.
5. Apply Foundation Over the Underpainted Areas
Choose a lightweight, medium-coverage foundation that won’t completely cover the contour and highlight work. Using a damp sponge or a foundation brush, gently pat the foundation over your face, blending it with the underpainting. Be careful not to swipe, as this can disturb the cream products underneath.
Tip: For an ultra-natural look, apply foundation only where needed, such as on areas without contour and highlight, or lightly layer it over the contoured areas for a sheer blend.
6. Blend and Set
After applying foundation, blend any remaining edges to make sure everything looks seamless. Set your makeup with a translucent powder, focusing on areas prone to shine. Finish with Fixing Spray.
7. Optional Touch-Ups
If you want to intensify any area, add a bit more contour, blush, or highlight on top, using either cream or powder, keeping it light.
This technique results in a dewy look since it uses cream products, but you can add a shimmer with a more traditional highlighter like a powder or keep the liquid theme going with a liquid luminizer like Shimmering Events!
Underpainting with cream makeup creates a beautifully layered, natural look that emphasizes your features with a soft, lit-from-within effect.
We love sharing our pro-tips and favourite products with you, don’t forget to check out our latest blogs.
Visit us online or in-store for all of your skincare, make-up and make-up education needs.
See you soon,
The Kryolan Education Team


